Setting up an M1 Mac for development
I got the M1 MacBook Air a few days ago. My 2017 MacBook Pro (13 inch) has started to feel slow and the keyboard started to become unreliable, so much that it now disrupts my flow when writing.
Last time when I switched computers, the setup process turned out to take two full days. In addition to setting up the OS and downloading apps, the main headache was moving forgotten configs and plugins in many different places.
To make this process faster in the future, this time I wrote down what I did. I got the most basic version of the Air, and plan to switch to a 15 or 16 inch MacBook Pro when it comes out in a year or so, so hopefully this guide will come in handy then.
Here are the steps:
1. Setup the OS
This was simple and fast, just a few dialog boxes. I use iCloud both as a password manager (through Keychain Access) and to save my mail and calendar account credentials. Once I signed in on the new computer, those things were synced.
2. Install apps
Here is a list of the app I installed, in the same order. I include information on native vs. Rosetta versions and some comments where applicable.
- Dropbox (Rosetta) - I store all my files in Dropbox, so I skipped the file migration step when setting up the OS. Their Selective Sync feature means that I see every file in the Finder, but don't need to download any file until I need it.
- Magnet (native) - I used Spectacle previously for window management, but it is no longer maintained and I wanted a native app. It works great, except that I cannot toggle the left/right keyboard shortcuts to resize the windows.
- Microsoft Office (native) - I logged in when opening an Office app for the first time. A standard license allows for up to five devices.
- Alfred 4 (native) - I use the Powerpack, which is a license for only one computer. I exported the preferences from the old computer (through Alfred's sync feature), deactivated the license there, activated it on the new computer, and imported the preferences. All my shortcuts and workflows seem to work the same.
- iTerm (native) - more on this below!
- Affinity Designer/Photo/Publisher (native) - their license is for multiple devices, so it was a quick login and download from their website
- Sublime Text (Rosetta) - more on this below!
- Postgres.app (Rosetta) - installed and started the server without issues
- Sketch (native) - I could have used an older version with Rosetta, but I renewed my licence to update to the latest, native, version
3. Configuration
Sublime Text
This is my main editor, and I have a bunch of plugins and custom key bindings. Luckily, the steps were relatively simple:
- On the old computer, go to ~/Library/Application Support/Sublime Text 3
- Copy the "Installed Packages" and "Packages" directories
- Paste them to the same folder on the new computer
Everything seems to work the same now, but we will see.
iTerm + zsh
zsh is now the default shell instead of bash on MacOS, so I don't need to do anything to switch to it. I installed "Oh my Zsh", which I use for theming and syntax highlighting in the terminal.
I was prompted to install both Xcode Command Line Tools and git in the terminal, so there was no work installing those.
I copied my my config file to the same location on the new machine:
~/.zshrcThere, I set new required paths, for example when installing Homebrew:
Homebrew
I used Homebrew to download quite a few different packages. The most common recommendation for ARM compatitbility was to open the terminal with Rosetta, and install all packages that way.
However, since many packages have already been made native, I wanted to install those natively as well. After a long search, I finally found a good solution. I followed the steps described there, and now have two different commands:
brew install to install native packages
ibrew install to install Intel-based packages
Node
All precompiled versions of Node were only available for Intel. I do most of my web development in Node, so I wanted to try to see whether I could install it natively.
Luckily, this could be done already. I used the Node Version Manager (nvm) to download and compile v15 of Node, which is compatible with M1 Macs. The Node REPL can confirm this:
> process.arch
'arm64'
This was the first test of the processor, as compiling Node from source took around 10-15 minutes. The computer got a bit hot, but made no noise as it doesn't have a fan.
How far is compatibility?
You can see which apps run natively and which still run through Rosetta. Open System Information, select Applications, and there you can see the list. In my case, quite a few applications are still running with Rosetta:
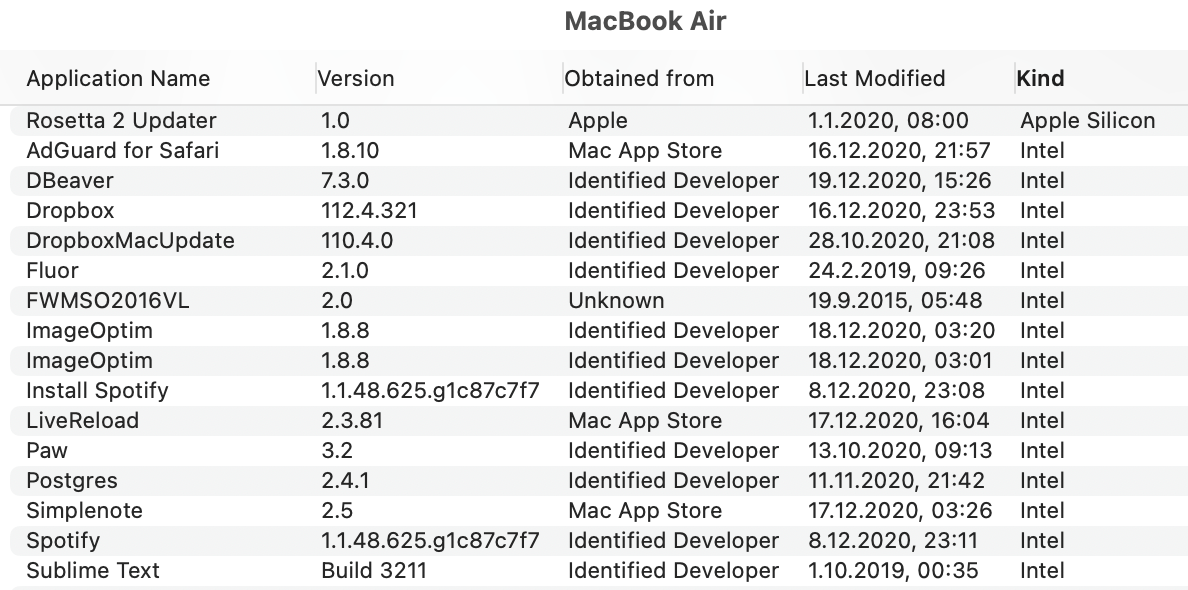
I will keep an eye out for updates to the native versions of these apps. However, I don't notice any slowness with Rosetta, and by most accounts Rosetta apps run very quickly, so it will probably not make a big difference.
The verdict
Overall I am very impressed with the M1 MacBook Air. The biggest difference is when browsing the web. Most websites today require significant resources to parse and paint the DOM. On the M1, this is much quicker than before.
Additionally, it feels like Apple have gotten their laptop design right for the first time since 2015. The keyboard is great - I hadn't appreciated how bad the butterfly switches were until getting this machine. Typing is quiet and the greater key travel gives more feedback when typing, so I never need to look at the keys. I am glad not to have the TouchBar, and hope that there will be an option to skip it when the next version of the 15/16 inch MacBook Pro is released.
Although much less painful than the last time I switched computers, the process this time still took me probably around 6-8 hours.
It was a good learning process, and I now have a better understanding of how the OS works, what files go where, and how to write and edit configuration files. It also increased my terminal scripting skills. Lastly, it was cool to be able to compile Node myself!
I was happy to see that there were no compatibility issues. I could have gone the simple path and installed most things through Rosetta, but did extra work to get the native versions of some of them. A lot of this time was because of that.
It would have been faster to use the Migration Assistant. I had to transfer a few app licenses manually, but this is done automatically using the assistant. This time, I wanted to start fresh with a clean install, but if I upgrade in a year or so I would probably choose the other path.
Newer: First post